How to Build a Smart Home on a $500 Budget
You don’t need a mansion—or a $5,000 shopping cart—to make your home feel smarter. Most people just want the basics: lights that turn on when you walk in, a thermostat that stops wasting money, and a camera that tells you what’s happening when you’re not home. That’s exactly what this guide covers: how to build a smart home on a $500 budget without buying junk you’ll replace in six months.
From the TrevMart perspective, Trevor and I were discussing the same question we hear all the time: “What should I buy first so it actually feels like a smart home?” The answer is simple—start with a solid hub and a few high-impact devices, then expand later.
Disclaimer: As an Amazon Associate, TrevMart earns from qualifying purchases at no extra cost to you.
What a $500 Smart Home Should Actually Do
Before you spend a dime, decide what “smart” means for your place. If you buy random gadgets, you’ll end up with five apps, two Wi-Fi networks, and a headache.
On a $500 budget, the best plan is to cover three pillars: comfort, security, and convenience.
- Comfort: automated temperature and lighting so your home adapts to you.
- Security: a doorbell or camera plus a smart lock (or at least smart alerts).
- Convenience: voice control, routines, and plugs for “dumb” devices.
Choose Your Smart Home “Brain” (Hub + Voice Assistant)
Your hub determines what plays nicely together. Choose one main platform and stick with it to avoid compatibility drama.
Option A: Amazon Alexa (Best value and widest device support)
An Echo speaker gives you voice control, routines, and quick automation without extra hardware. For many homes, this is the easiest start.
- Why it’s good: tons of compatible devices and usually the lowest entry cost.
- Best for: anyone who wants fast setup and lots of budget options.
Option B: Google Home (Great for voice and home-wide control)
Google’s voice recognition is excellent, and it works well for shared households. If you already use Android and Google services, it feels natural.
- Why it’s good: strong voice commands and household management.
- Best for: families and Android-first homes.
Option C: Apple HomeKit (Best privacy vibe, higher cost)
HomeKit can be rock-solid, but budget options are slimmer. It can still work under $500, but you’ll need to shop carefully.
- Why it’s good: tight ecosystem and privacy-forward approach.
- Best for: iPhone households willing to pay a bit more per device.
The $500 Shopping List (High Impact, Low Regret)
Below is a balanced starter kit that feels like a “real” smart home on day one. Prices vary by sales, but this stays realistic if you buy during normal promos.
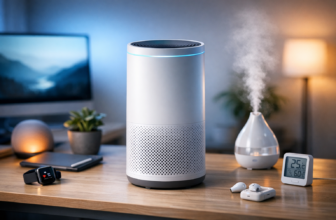
1) Smart Speaker / Display (Your control center)
Start with an Echo Dot / Echo Pop, Nest Mini, or a small smart display. A display is great in the kitchen or entryway so you can see cameras, timers, weather, and controls at a glance.
- Budget target: $25–$90
- Benefit: hands-free control so your routines actually get used.
2) Smart Thermostat (The “pays for itself” upgrade)
If you want one device that can cut waste fast, this is it. A smart thermostat learns schedules (or follows yours) and helps reduce heating/cooling when nobody’s home.
- Budget target: $80–$180
- Benefit: less energy waste without constantly fiddling with settings.
3) Smart Lighting (Start with two bulbs or one room)
Go for dimmable smart bulbs in your most-used room first—living room or bedroom. Or use a smart switch if you prefer controlling a whole fixture at once.
- Budget target: $20–$60 (starter bulbs), $25–$50 (one smart switch)
- Benefit: lighting that matches your routine—wake-up, movie time, bedtime—without lifting a finger.
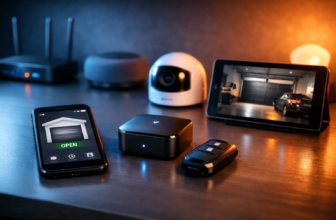
4) Video Doorbell or Indoor Camera (Instant peace of mind)
If you care about security, a doorbell cam is the highest-impact single purchase. If you live in an apartment, an indoor cam aimed at the entryway can be just as useful.
- Budget target: $35–$120
- Benefit: quick alerts and video checks so you’re not guessing who’s at the door.
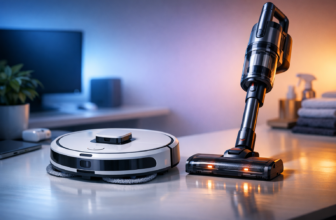
5) Smart Plugs (Make “dumb” devices feel smart)
Smart plugs are the secret weapon for budget smart homes. Use them for lamps, fans, coffee makers (with a physical switch), holiday lights, and even chargers.
- Budget target: $20–$45 for a 2–4 pack
- Benefit: automation without replacing the device you already own.
6) (Optional) Smart Lock (Convenience + better access control)
This is optional because it can eat a big chunk of the budget. But if you hate hiding keys or you want codes for guests, it’s one of the most “daily-use” upgrades you can make.
- Budget target: $100–$200
- Benefit: no-key entry and fewer “did I lock the door?” moments.
A Sample $500 Build (Realistic Totals)
Here are two sample builds that stay near $500. Treat these like templates, not rules.
Build A: Best All-Around Starter
- Smart speaker: ~$40
- Smart thermostat: ~$130
- 2–4 smart bulbs: ~$35
- Video doorbell: ~$80
- 4-pack smart plugs: ~$30
- Estimated total: ~$315
This leaves budget room for a smart lock later, more bulbs, or a second camera.
Build B: Security-First (If you travel or get deliveries often)
- Smart display: ~$80
- Video doorbell: ~$100
- Indoor camera: ~$35
- Smart lock: ~$150
- Smart plugs: ~$30
- Estimated total: ~$395
Add lighting next, and you’ll feel the “smart home” effect across the whole day.
Setup Priorities (So It Works Smoothly)
Smart home frustration usually comes from Wi‑Fi and messy setup. Do these in order and you’ll save yourself hours.
Step 1: Fix the Wi‑Fi first
If your router is old or coverage is spotty, your “smart” devices will feel dumb. Put your hub/speaker near the center of your home and avoid cramming it behind a TV.
Step 2: Create simple routines (don’t over-automate)
Start with two routines you’ll use every day. Then build from there.
- Good morning: lights to 30%, thermostat setpoint tweak, news/weather.
- Good night: turn off lights, lock door (if supported), lower thermostat, arm camera alerts.
Step 3: Keep devices on one platform when possible
Mixing brands is fine, but mixing ecosystems can get annoying. If you choose Alexa, prioritize “Works with Alexa” devices. Same idea for Google Home or HomeKit.
Don’t blow your budget on the fanciest camera, then cheap out on the basics you touch every day. A smart thermostat + a few lights and plugs will make your home feel smarter more often than a single premium gadget. Also: set up a separate guest Wi‑Fi network for smart devices if your router supports it—it keeps things organized and can improve reliability.
Pros & Cons of Building a Budget Smart Home
Pros
- Real convenience: daily routines reduce small annoyances fast.
- Better energy control: thermostats and scheduling cut waste.
- Scales easily: you can add devices room-by-room.
Cons
- Compatibility traps: not every device plays nicely with every ecosystem.
- Subscription creep: some cameras charge monthly for cloud storage/history.
- Wi‑Fi dependence: weak coverage causes lag and disconnects.
Where to Spend vs. Save
If you only remember one thing: spend money where reliability matters, save where “good enough” is fine.
- Spend on: thermostat, lock (if you buy one), and your main hub/speaker.
- Save on: smart plugs and starter bulbs (you can upgrade later).
- Watch for: camera subscriptions—sometimes a cheaper camera costs more long-term.
Final Verdict: Yes, $500 Is Plenty
A $500 smart home doesn’t mean cutting corners—it means buying the right first devices. Start with a hub, cover comfort and security, then use plugs and lighting to make daily life smoother. If you avoid platform chaos and set up two solid routines, your home will feel smarter immediately.
What’s your top priority for a smart home—saving energy, security, or pure convenience?